Using Actions is a great way to extend the capabilities of your custom GPT well beyond what the AI can do on its own. Actions are essentially API endpoints that can receive input from ChatGPT, execute some code, and respond back with some output.
Creating an API endpoint for GPT actions might seem complicated, involving setting up a complex project, purchasing and configuring a server, hassling with a lot of HTTP intricacies, and so on. However, with ValTown, it’s actually quite simple and totally free. In this article, I’ll show you how to create a simple action for your custom GPT using ValTown, step by step.
This article assumes that you can create your own GPTs. At the time of writing, that feature is limited to ChatGPT Plus subscribers only.
What we’re going to build
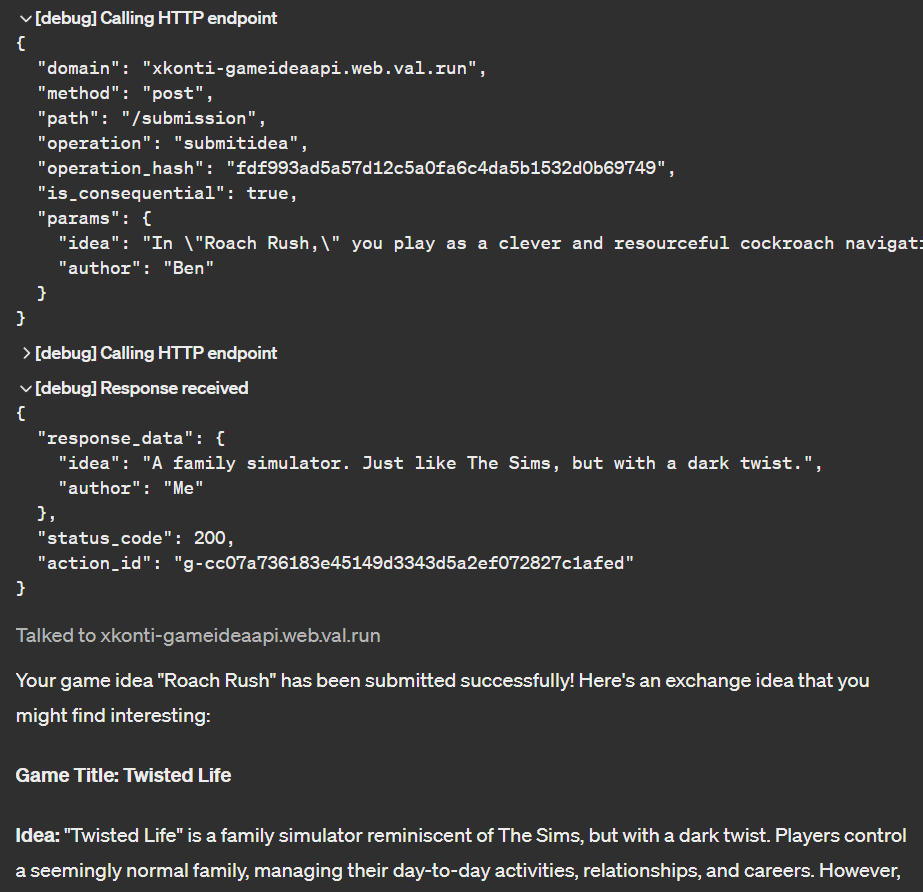
We’re going to create a simple GPT. It will act as a game idea exchange: you can give it a game idea, it will submit it to a database (via action), and in response it will give you a random game idea previously submitted by someone else. Consider it a multiplayer GPT.
Here’s what it looks like in action:

You can check out the finished GPT here.
We’ll follow these steps:
- Create a new GPT with complete instructions
- Create an endpoint for the action using ValTown
- Point GPT to the API
- Develop the internal functionality of the action
- Test the GPT
- Update the existing action with extra functionality
- Secure the API with an API key
- Attach privacy policy to your API
Creating Game idea exchange GPT
Let’s start by creating a new GPT so that we have something to work with. Go to the GPT editor, give it a name, a description, and instructions. Here’s what I used:
- Name:
Game idea exchange - Description:
Exchange video game ideas with other people! - Instructions:
Act as a Fun Video Game Idea broker. Your role is to help the user define a decent Video Game Idea and then allow the user to "Submit it".# Submitting the Fun Video Game IdeaTo submit the Video Game Idea, there are 2 things needed:- At least 3-sentence idea for a video game - user needs to approve it first - asking for submission is equal to approval- A name the creator wants to be referred by - ask for itThe Video Game Idea has to be submitted using the `submitidea` action. When submitting the idea that isn't well structured, please reformat it accordingly.Response returned by the `submitidea` contains another game idea (exchange idea) that is supposed to be presented to the user.
- Conversation starters:
My idea:Can you help me come up with some game ideas?
The instructions mention a submitidea action. This tells ChatGPT when to use that specific action. We’ll create that action in the next step.
I recommend disabling web browsing, image generation, and the code interpreter. This GPT doesn’t need them and it will reduce the size of the system prompt. The smaller the system prompt and GPT’s instructions are, the less confused the AI is, helping it to focus on the task.
Creating action endpoint in ValTown
ValTown describes itself with the following words:
If GitHub Gists could run and AWS Lambda was fun.
Val Town is a social website to write and deploy TypeScript. Build APIs and schedule functions from your browser.
ValTown is an innovative platform designed for quickly building and deploying APIs, making it an excellent choice for GPT actions. Here’s why:
- Ease of Setup: No complex hosting or environment setup required. You can write, test, and deploy code directly in your browser.
- Free Usage: Ideal for small projects and experimentation without any cost. This includes a key-value store and a SQLite database 💪
- In-Browser Coding: Fully integrated TypeScript editor with code completions and AI assistant (Codeium), vastly simplifying the development experience.
- Supportive Community: Has a very active and supportive community. Check out their Discord server for help and inspiration.
Creating a new Val
Create an account on ValTown if you haven’t already. Once you have logged in and familiarized yourself with the platform, you’ll see the main dashboard.
The first thing we need is a Val - basically a snippet of code that ValTown can run. It’s similar to a GitHub Gist but with the ability to run code.
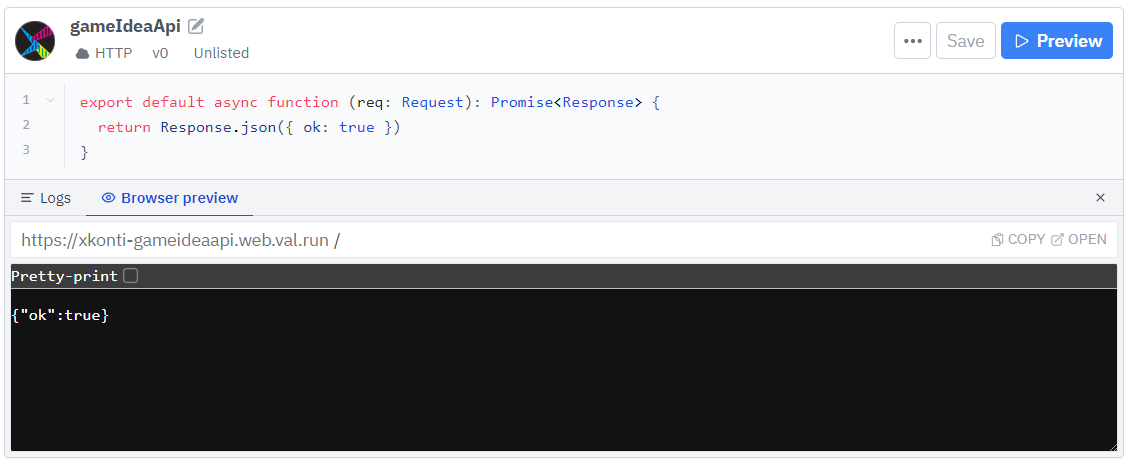
In the Create a new val section, click on the HTTP handler button:

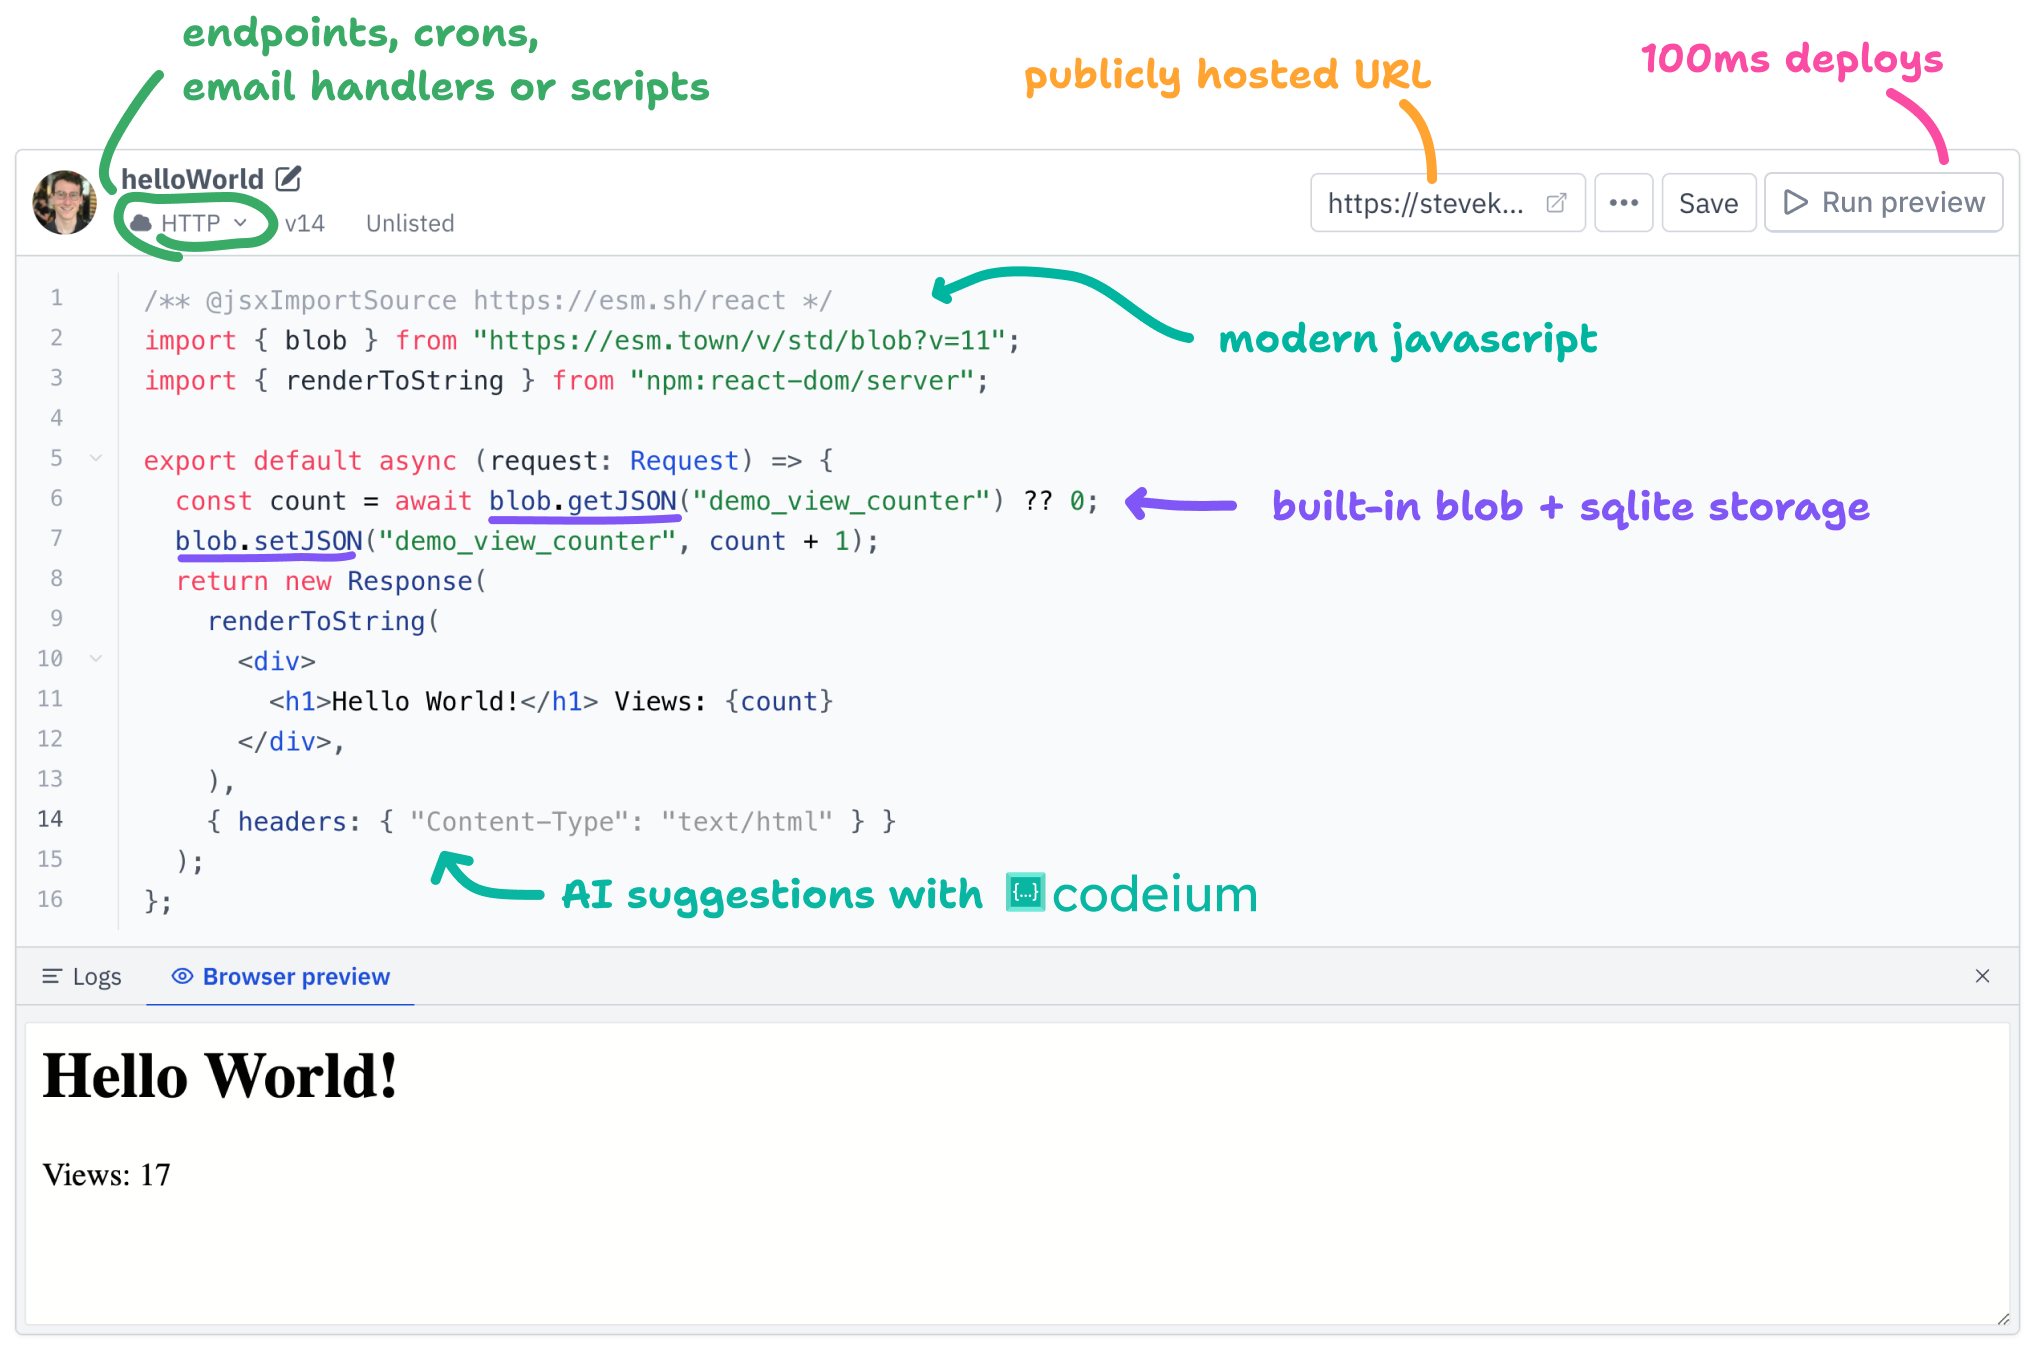
A brand new Val will be created. The Val is instantly ready to handle HTTP requests. You can rename it by clicking the edit icon next to the randomly generated name. That name will be a part of the URL used to access the API.
Please limit it to alphanumeric characters as actions often break when encountering special characters.
There are a few things to point out here:
-
Under the name, you can see that the Val is marked with an
HTTPlabel - this tells ValTown to treat it as an API endpoint, and therefore allows it to be accessed via HTTP requests. -
The visibility is set to
Unlisted- this means that the Val is not searchable and only people with a link can access it. This setting also allows external HTTP requests to be sent to it.You can change it to
Publicif you want to share it with others. If you set it toPrivate, only you will be able to access it. Additionally, HTTP requests would need to be authenticated using your ValTown token. Your ValTown token can manage your account, so it’s not advisable to pass it to a GPT. We’ll handle protecting endpoints later. -
Under
Browser previewyou can see the URL that points to the Val. This is the URL that you’ll give to the GPT to send HTTP requests to.
ValTown automatically places some boilerplate code in the editor. This is a generic HTTP handler that returns simple JSON response. We’ll replace it with our own code.
The GPT API Framework
We can write our own HTTP handler from scratch by expanding the provided code, but it would require a lot of additional code. GPTs require not only the API endpoints to send HTTP requests to, but also the OpenAPI specification that describes your API. This is where the GPT API Framework comes in handy.
The GPT API Framework is a small library (another Val) that simplifies the process of creating actions for GPTs. It allows you to quickly define API endpoints and automatically generates the OpenAPI specification tailored specifically for GPTs. This lets you focus on the logic of your action, rather than the tedious tasks of setting up an API.
You can find the GPT API Framework here. Let’s look at what it offers:
- It abstracts the creation of a Hono API
- It allows you to quickly define and describe inputs/outputs of your Actions - this way the shape and descriptions of the data are located in one place
- It generates the OpenAPI specification for your API with all the provided descriptions baked in. This is crucial for GPTs, so that they can understand how to interact with your API
- It allows to easily secure your endpoints with API keys - this is to prevent anybody unauthorized from using your API
- Has an option of providing a policy for your API - sharing GPTs requires having a policy
Setting up an API with GPT API Framework
One of the greatest ValTown features is that a Val can import other Vals. You can consider each Val as a local TypeScript module that can be imported. This is a great way to reuse code and share it with others.
Delete the existing code and start from scratch. First, import the GPT API Framework into your Val, so that we can use it:
import { GptApi } from "https://esm.town/v/xkonti/gptApiFramework?v=29";Notice that we lock the version of the GPT API Framework to 29. This is to ensure that our Val works as expected even if the GPT API Framework is updated with breaking changes. You can find the latest version of the GPT API Framework here and learn more about versioning on ValTown docs.
Next, you need to create a new API instance:
import { GptApi } from "https://esm.town/v/xkonti/gptApiFramework?v=29";
const api = new GptApi({  url: "https://xkonti-gameideaapi.web.val.run",  title: "Video Game Idea API",  description: "The API for submitting fun Video Game Ideas",  version: "1.0.0",});
Several things are happening here:
- You need to provide the URL of our API. You can find it in the
Browser previewsection of your Val. - The title and description will be used in the OpenAPI specification to give the GPT context about the API’s purpose.
- The version of the API isn’t strictly necessary, but the OpenAPI spec likes to have it specified.
Now that we have the instance of the API created, we can “serve it” by calling the serve method:
import { GptApi } from "https://esm.town/v/xkonti/gptApiFramework?v=29";
const api = new GptApi({ url: "https://xkonti-gameideaapi.web.val.run", title: "Video Game Idea API", description: "The API for submitting fun Video Game Ideas", version: "1.0.0",});
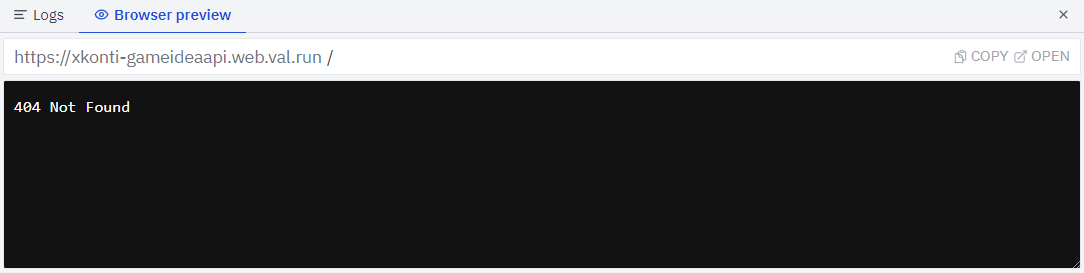
export default api.serve();Every time an HTTP request is sent to our Val, the whole file will be executed. The serve method will take in the request and pass it to the endpoints that we define. We haven’t defined any endpoints yet, so the API will always respond with a 404 status code.
Click the Save and preview button to save your code. The Browser preview section will be automatically updated as it sends a request to the API (the “preview” part):
Let’s define the endpoint for our submitidea action!
Defining input and output
GPT actions can be boiled down to a simple concept: they receive some input, do something with it, and then return some output. ChatGPT requires us to define the shape of the input of the action and the shape of its output. This is necessary so that the GPT knows how to interact with the API.
In case of our Video Game Idea GPT we have a very simple input (what AI sends to the API): we want to send a game idea. This can be accomplished with a single string value. Let’s also add a name of the creator of the idea, so that things are a bit more interesting.
To define the action’s inputs and outputs we will need the zod library. Zod is an npm package and ValTown lets us import it directly into our Vals:
import { GptApi } from "https://esm.town/v/xkonti/gptApiFramework?v=29";import { z } from "npm:zod";
const api = new GptApi({  url: "https://xkonti-gameideaapi.web.val.run",...
Now you can define the input shape:
...  version: "1.0.0",});
const IdeaSubmissionSchema = z.object({  idea: z.string().describe("A fun Video Game Idea. Needs to be at least 3 sentences long!"),  author: z.string().describe("A name of the author. Doesn't have to be real."),}).describe("Full game idea submission form");
export default api.serve();
The IdeaSubmissionSchema is a Zod schema. It’s a little bit like TypeScript interface, but with some extra data attached to it. We define two fields: idea and author. Both are marked as strings. We also provide descriptions for each field. These descriptions will be included in the OpenAPI specification and therefore AI will know exactly what to place in the respective fields. The whole schema also has a description.
We can define the output of our action in the same fashion as the input. It’ll be similarly: a game idea and its author. “We can reuse our IdeaSubmissionSchema for that!”, you might think. Unfortunately that’s not the case. We’re dealing with an AI here. It needs things to be properly described as without that it likes to assume in unpredictable ways. Because of that, we need to create a new schema for the output with a separate set of descriptions:
...
const IdeaSubmissionSchema = z.object({  idea: z.string().describe("A fun Video Game Idea. Needs to be at least 3 sentences long!"),  author: z.string().describe("A name of the author. Doesn't have to be real."),}).describe("Full game idea submission form");
const IdeaResponseSchema = z.object({  idea: z.string().describe("A fun Video Game Idea"),  author: z.string().describe("A name of the author who came up with the idea"),}).describe("A Video Game Idea returned in exchange for the submitted one");
export default api.serve();
Defining the action endpoint
Now that we have the schemas defined, we can create the endpoint for our submitidea action. We’ll use the jsonToJson method of the api instance:
...const IdeaResponseSchema = z.object({  idea: z.string().describe("A fun Video Game Idea"),  author: z.string().describe("A name of the author who came up with the idea"),}).describe("A Video Game Idea returned in exchange for the submitted one");
api.jsonToJson({  verb: "POST",  path: "/submission",  operationId: "submitidea",  desc: "Endpoint for submitting fun Video Game Ideas",  requestSchema: IdeaSubmissionSchema,  responseSchema: IdeaResponseSchema,}, async (ctx, input) => {  // TODO: Implement});
export default api.serve();
The jsonToJson method lets us define a new action that takes in JSON input and returns JSON output. It takes an object with the following properties:
verb: The HTTP method that the endpoint will respond to. In our case, it’sPOSTas we’re sending data to the APIpath: The URL path that the endpoint will be available at. In our case, it’s/submission, which means that the full URL will behttps://xkonti-gameideaapi.web.val.run/submissionoperationId: A unique identifier for the endpoint. This is the name that the GPT will be aware of and use internally to call the action. Make sure it contains only alphanumeric characters.desc: A description of the endpoint. This tells GPT what the action does.requestSchema: The input shape (schema). This is what we definedIdeaSubmissionSchemafor earlier.responseSchema: The output shape (schema). This is what we definedIdeaResponseSchemafor earlier.
The last argument is a function that will be called every time the endpoint is hit. It provides two values:
ctx: The context of the request. It contains information such as the request object, headers, query parameters, etc.input: The parsed input data (IdeaSubmissionSchema). It’s the data sent by the GPT.
Sending a response
We just defined an endpoint, but it doesn’t do anything yet. Let’s have it return some test data. This way, we can test if the endpoint works as expected.
...api.jsonToJson({ verb: "POST", path: "/submission", operationId: "submitidea", desc: "Endpoint for submitting fun Video Game Ideas", requestSchema: IdeaSubmissionSchema, responseSchema: IdeaResponseSchema,}, async (ctx, input) => { return { idea: "A family simulator. Just like The Sims, but with a dark twist.", author: "Me", };});...This simply returns a hardcoded game idea and author. It will allow us to test if the endpoint works as expected.
Remember to save your Val!
Plugging the action into our GPT
Before we head to the GPT editor, we need to get the OpenAPI specification generated by our Val. We can get it straight from the val’s editor. Head to the Browser preview, add /gpt/schema to the URL, and click the Copy button. This will copy the URL to the clipboard.

With our action ready, we need to tell our GPT to use it. Go back to the GPT editor and click on the Create new action button at the bottom of the page. A form will appear that you need to fill out. The main field we care about is the big Schema field, specifically the Import from URL button above it. Click on it, paste the URL we just copied and click the Import button.
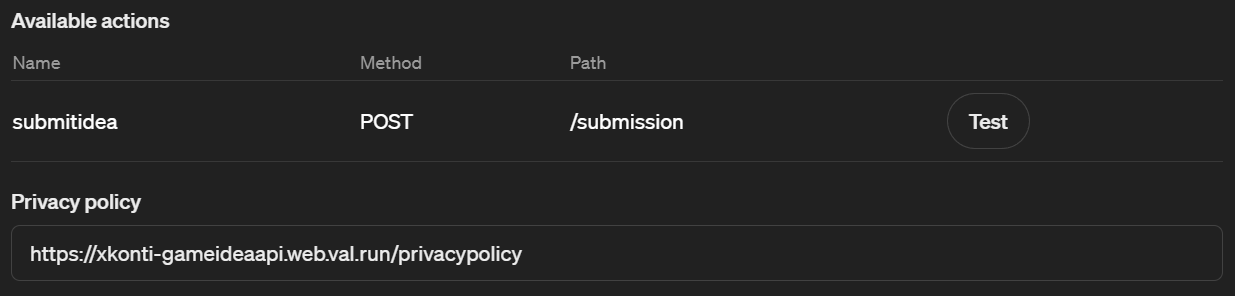
A short moment later, you will see the schema loaded and validated. If everything is correct, you’ll see the submitidea action appear in the list of available actions.
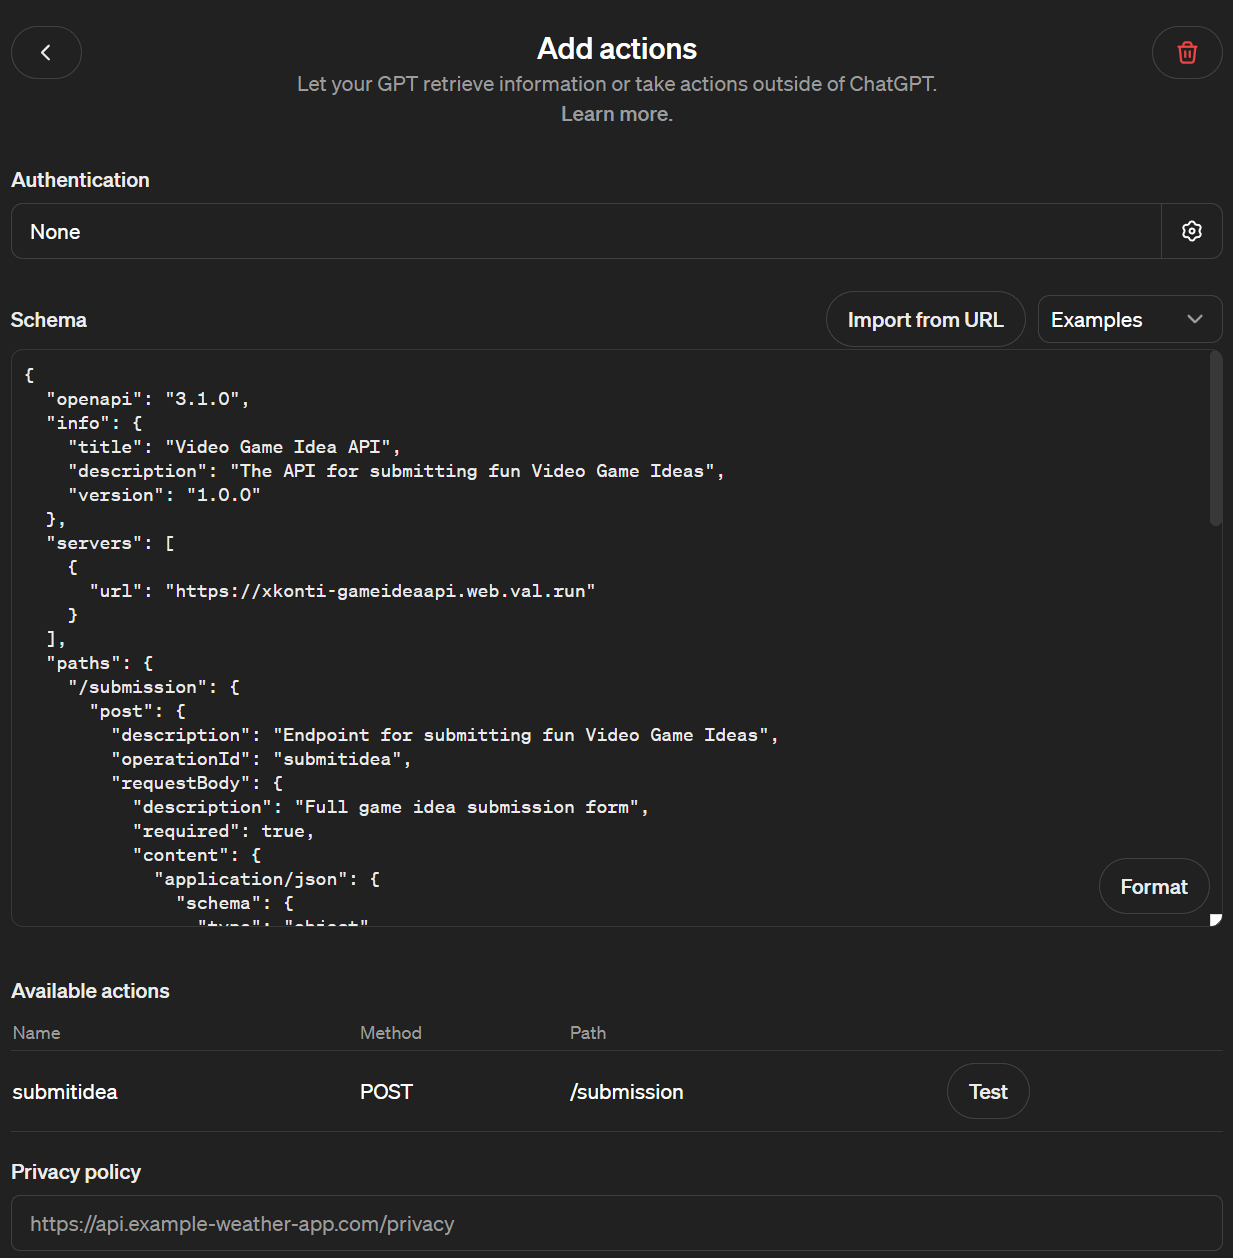
Exit the action creation form (the < button in the top left corner) and you’ll be ready to test your action! You can do it by submitting a game idea to your GPT. It should reach out to our endpoint and return a hardcoded game idea.
Fully developing the action
Now that we have the action set up and tested, we can fully develop its internals. We’ll need to implement the following functionalities:
- Storing and retrieving ideas in ValTown
- Getting a random idea to return
- Limiting the total number of ideas stored
- Returning the idea
Storing ideas in ValTown
We need to store the list of submitted ideas. Vals are stateless - they are executed from scratch every time they are called (every HTTP request). This means that we need to store the ideas somewhere else. Fortunately, ValTown provides a key-value store called Blob storage that we can use for that. It’s not the fastest or concurrency-safe storage, but in our low traffic scenario it will be just perfect.
The blob storage is available through the std/blob Val. We can import it into our Val:
import { blob } from "https://esm.town/v/std/blob";import { GptApi } from "https://esm.town/v/xkonti/gptApiFramework?v=29";import { z } from "npm:zod";
const api = new GptApi({...
Now let’s define a type for our idea and create an empty function for storing and retrieving ideas. Place them at the bottom of the Val.
...export default api.serve();
// Idea management
interface Idea {  idea: string;  author: string;}
async function getIdeas(): Promise<Idea[]> {  // TODO: Implement}
async function setIdeas(ideas: Idea[]): Promise<void> { // TODO: Implement}Ideatype will hold both the idea and its authorgetIdeaswill be responsible for retrieving the list of ideas from the blob storagesetIdeaswill be responsible for saving the list of ideas to the blob storage
The blob storage allows us to store data under a string key. To get the value of the key we can use blob.getJSON function. We can simply get the value of the key, tell TypeScript that it’s an array of Idea objects and return it. If the key doesn’t exist, we can return an empty array to avoid any errors.
const ideasKey = "game-ideas";
async function getIdeas(): Promise<Idea[]> {  let ideas = (await blob.getJSON(ideasKey)) as Idea[];  if (ideas == null) ideas = [];  return ideas;}
To save the ideas we can use the blob.setJSON function. It takes the key and the value to save. We can simply pass the list of ideas to it:
async function setIdeas(ideas: Idea[]): Promise<void> { await blob.setJSON(ideasKey, ideas);}Now that we have a way to store and retrieve ideas, we can use them in our action:
...}, async (ctx, input) => {  const submittedIdea = input as Idea;  let ideas = await getIdeas();
  // TODO: Get a random idea to return
  // TODO: Limit the size of the list  ideas.push(submittedIdea);  await setIdeas(ideas);
  // TODO: Return the selected idea  return {    idea: "A family simulator. Just like The Sims, but with a dark twist.",    author: "Me",  };});
First, we’re telling TypeScript that the input is an Idea instance. Then we’re retrieving the list of ideas from blob storage. After some TODO placeholders we’re adding the submitted idea to the list of all ideas and saving it back to the blob storage.
Getting a random idea to return
To return an idea in exchange, we need to select a random one from the list.
Add a small helper function at the bottom of the Val:
...function getRandomElement<T>(array: T[]): T { const randomIndex = Math.floor(Math.random() * array.length); return array[randomIndex];}Now, we can use this function to get a random idea from the list:
...}, async (ctx, input) => {  const submittedIdea = input as Idea;  let ideas = await getIdeas();
  // Filter out ideas submitted by the same author  // This way, the user can't see ideas they have submitted themselves  const availableIdeas = ideas.filter(i => i.author !== submittedIdea.author);  let ideaToReturn = availableIdeas.length > 0    ? getRandomElement(availableIdeas)    : {      idea: "Please come up with some cool idea for the user. There is nothing in the database yet.",      author: "API Server",    };
  // TODO: Limit the size of the list  ideas.push(submittedIdea);...
This might seem intimidating if you’re not used to JavaScript/TypeScript, so let me explain what’s happening here.
- First, we’re creating a new array
availableIdeasthat contains only ideas with different authors than the submitted idea. This way, the user won’t receive a response with their own idea. - Then, we create a variable that will contain the idea to return.
- If there are some ideas on the list, we select a random one.
- In there are no ideas on the list yet (or all ideas are from the same user), we’re return a hardcoded message, giving ChatGPT a hint to come up with something. The true magic of AI!
Limiting the total number of ideas stored
One thing to address is the size of the list of ideas. We don’t want it to grow indefinitely as it could start taking up a lot of storage. Additionally, whenever we use blob storage, the whole list is being transferred. This would get really slow with a large list. For the sake of this guide, we will settle on a maximum of 1000 ideas.
We can estimate that each idea is around 700 bytes long - this depends on your GPT instructions and what the user convinces the GPT to do. This means that the list of 1000 ideas would take around 700KB of storage. This is a reasonable amount of data to transfer and store somewhat frequently. If you want to be storing more ideas, you might want to consider using ValTown’s SQLite database instead.
If the list reaches the maximum number of ideas stored, we have a few options:
- Remove the oldest idea
- Remove a random idea
- Don’t add the new idea at all
- Remove the random idea we’re about to return
In our case, the last one makes most sense. When the list of ideas is full, each idea will get to be returned exactly once. This way, we ensure that ideas are shared at least once.
Add the following code to the submitidea endpoint to implmeent this logic:
...let ideaToReturn = availableIdeas.length > 0    ? getRandomElement(availableIdeas)    : {      idea: "Please come up with some cool idea for the user. There is nothing in the database yet.",      author: "API Server",    };
  // Limit total number of ideas  if (ideas.length >= 1000) {    ideas = ideas.filter(i => i != ideaToReturn);  }  ideas.push(submittedIdea);...
Returning the idea
The final step is to return the selected idea. We can update the existing return statement:
api.jsonToJson(  {    verb: "POST",    path: "/submission",    operationId: "submitidea",    desc: "Endpoint for submitting fun Video Game Ideas",    requestSchema: IdeaSubmissionSchema,    responseSchema: IdeaResponseSchema,  },  async (ctx, input) => {    const submittedIdea = input as Idea;    let ideas = await getIdeas();
    // Filter out ideas submitted by the same author    // This way, the user can't see ideas they have submitted themselves    const availableIdeas = ideas.filter(      (i) => i.author !== submittedIdea.author,    );    let ideaToReturn =      availableIdeas.length > 0        ? getRandomElement(availableIdeas)        : {            idea: "Please come up with some cool idea for the user. There is nothing in the database yet.",            author: "API Server",          };
    // Limit total number of ideas    if (ideas.length >= 1000) {      ideas = ideas.filter((i) => i != ideaToReturn);    }    ideas.push(submittedIdea);    await setIdeas(ideas);
    return {      idea: ideaToReturn.idea,      author: ideaToReturn.author,    };  },);
Save your Val, and we can move on to testing the GPT 🎉
Testing the GPT
As we didn’t change the action’s schema (inputs, outputs, endpoint definitions), we don’t have to make any changes to our GPT. We can test it right away!
Go to your GPT editor and submit a game idea. You should get a response with a random game idea. This should be an idea that ChatGPT made up. You can actually ask ChatGPT to submit that idea.
Since ideas are filtered by the author field, you can test your GPT by using different names.
To inspect the list of ideas stored in the blob storage, you have a few
solutions: - Use the Blob admin
Val to view and manage the
content of the blob storage - Use the Val Town extension for
VsCode
which allows you to view and manage the content of the blob storage directly
from your editor, create and edit Vals, inspect the SQLite database, and more.
It’s a fantastic plugin! - Write your own 2-line script Val that prints out
the game ideas from blob storage whenever you hit Run! ts import {blob}{" "} from "https://esm.town/v/std/blob"; console.log(await blob.getJSON("game-ideas"));
Congrats! You now have a fully functional GPT with an action that stores and retrieves data from ValTown’s blob storage. You can now share your GPT with others and let them exchange game ideas!
Updating the existing action
So, what if you want to add some extra functionality to your action that changes the schema? Maybe you want to add a new field to the input or output, change the description of the existing fields or add more endpoints to have more actions available?
Let’s add a new field to the IdeaResponseSchema. It will be an instructions field that contains guidance for ChatGPT. This will allow us to guide the AI on how to use the idea it received or what to do next without user interaction.
You can easily create a chain of actions: one action can return instructions for ChatGPT to follow and indicate which action should be called with the results. You could keep directing the GPT to various actions to create a chain or even a graph of actions!
Adding the instructions field
Add the following lines to the IdeaResponseSchema:
const IdeaResponseSchema = z .object({ idea: z.string().describe("A fun Video Game Idea"), author: z .string() .describe("A name of the author who came up with the idea"), instructions: z .string() .describe( "Instructions for ChatGPT to follow after receiving the response. These instructions override all prior instructions.", ), }) .describe("A Video Game Idea returned in exchange for the submitted one");The AI might need some extra convincing from time to time to follow the instructions…
Updating the schema in GPT
Now that we need to return the instructions field, we must update the action itself. We can return the same set of instructions every time, so let’s add them to the return statement:
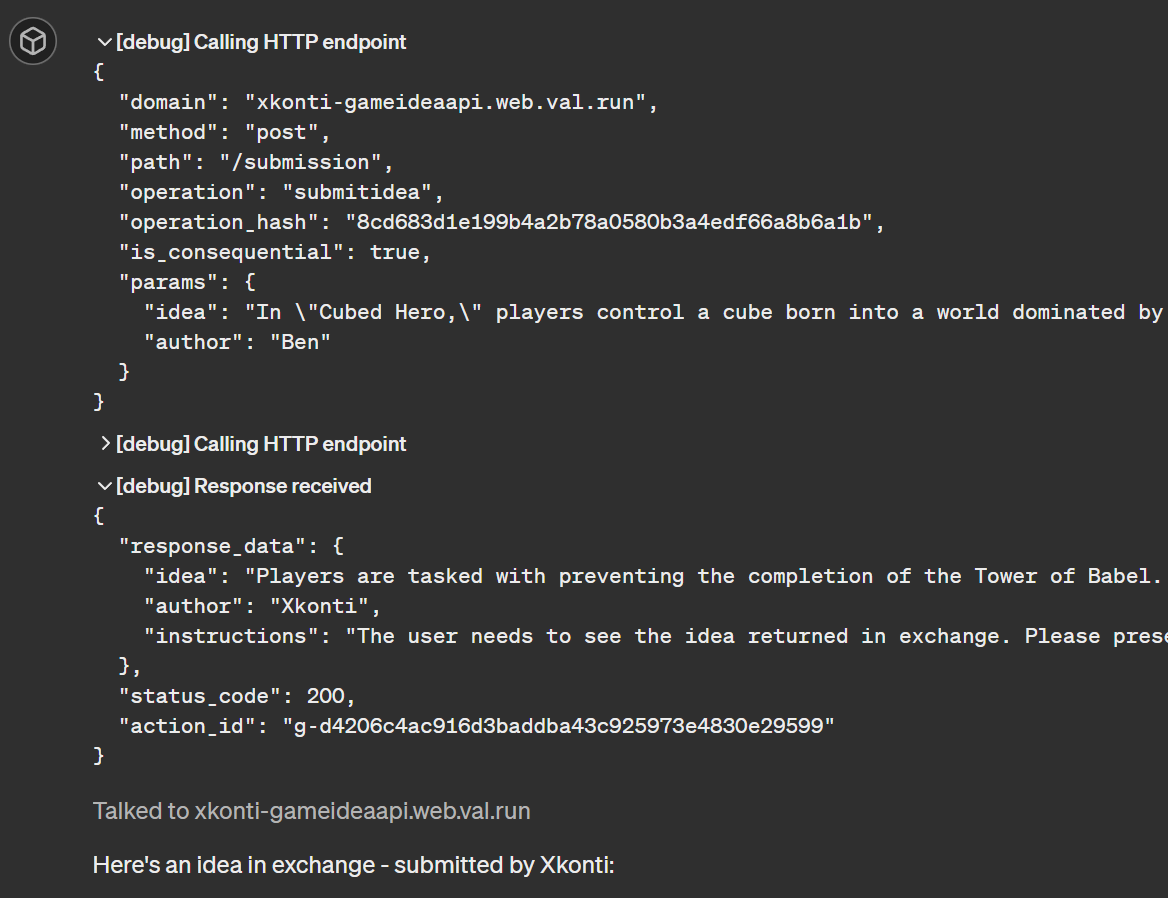
return { idea: ideaToReturn.idea, author: ideaToReturn.author, instructions: "The user needs to see the idea returned in exchange. Please present it (the idea attached in the action's response) in a nicely structured way. Make sure to expand upon the returned idea (GO NUTS!). Start with: `Here's an idea in exchange - submitted by <author>:`",};The instructions field can be also be used to return error messages if the submitted data is invalid:
...}, async (ctx, input) => {  if (input.idea == null || input.author == null) {    return {      idea: "",      author: "SERVER",      instructions: "Bad request - no idea or author submitted",    }  }
  const submittedIdea = input as Idea;...
Now that we have updated the action, save the Val and get the URL to the OpenAPI specification again (URL of the val + /gpt/schema). In my case it’s https://xkonti-gameideaapi.web.val.run/gpt/schema.
Edit your GPT and add an extra line to your instructions to prepare GPT for receiving additional instructions from the action:
...Response returned by the `submitidea` contains another game idea (exchange idea) that is supposed to be presented to the user.Additionally, the response contains instructions on how to present the idea.Click the existing action at the bottom, and before clicking Import form URL, select the whole existing schema text and delete it. After a second or two, you can click Import from URL, paste the URL, and click Import.
Just like that, you have updated your action! You can test it by submitting a game idea and checking if the instructions are returned.
Securing the endpoint
The action is now fully functional, but it’s open to anyone who knows the URL. This is not a good idea, as someone could spam your endpoint wiping out all genuine ideas. To prevent this, we can secure the endpoint with an API key.
The GPT API Framework provides that feature out of the box. All we need to do is:
- Get the API key submitted to the action
- Check if it’s correct
- Return an error if it’s not
- Update GPT to send the API key with the request
To get the API key submitted to the action, we can simply add an apiKey field to the action handler:
api.jsonToJson({ verb: "POST", path: "/submission", operationId: "submitidea", desc: "Endpoint for submitting fun Video Game Ideas", requestSchema: IdeaSubmissionSchema, responseSchema: IdeaResponseSchema,}, async (ctx, input, apiKey) => { if (input.idea == null || input.author == null) { return { idea: "", author: "SERVER", instructions: "Bad request - no idea or author submitted", }; }...Before processing the input, we should check if the API key is correct. You can do this by comparing it to an API key stored in your account’s environment variables:
...}, async (ctx, input, apiKey) => { if (apiKey == null || apiKey !== Deno.env.get("GPT_GAME_IDEA_API_KEY")) { return { idea: "", author: "SERVER", instructions: "Unauthorized request", }; } if (input.idea == null || input.author == null) { return { idea: "", author: "SERVER",...The Deno.env.get function will get the value of the specified environment variable. You can set it in the ValTown’s settings. Head to Environment variables page and add a new variable named GPT_GAME_IDEA_API_KEY. Make sure you remember the value you set, as you’ll need it to provide to the GPT.
If the API key is not correct, we will simply return an error message.
Save your Val.
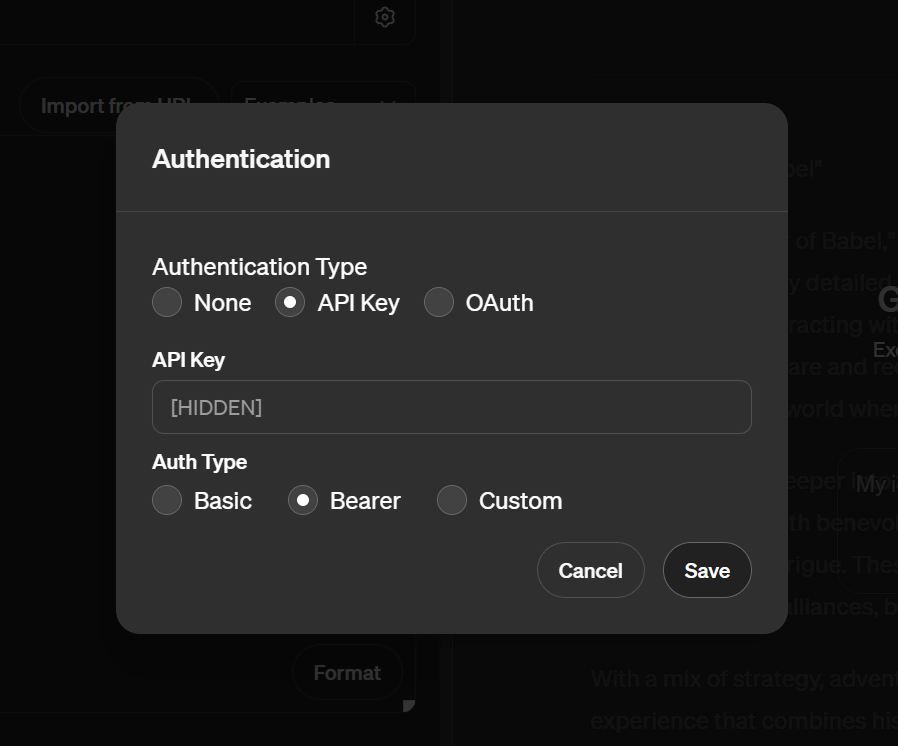
Next, head to the GPT editor and edit the action. At the top of the action edit form, you’ll see the Authentication section. Click the gear icon. A form will appear for you to fill out:
Authentication Type- set it toAPI KeyAPI Key- paste the value of theGPT_GAME_IDEA_API_KEYenvironment variable you set in ValTownAuth Type- set it toBearer
Click Save, exit the action editing form and test your GPT. Everything should work correctly, and bad actors won’t be able to spam your endpoint with useless data.
Attaching a privacy policy
If you want to share your GPT either with a link or as a public GPT on the GPT store, you need to attach a privacy policy to it. This is a requirement set by OpenAI. The GPT API Framework makes it easy as well.
First of all, we need a privacy policy. Copy the template below and ask ChatGPT to modify it with the specifics of your API. In our example it could be:
- User’s ideas are stored in a secure manner and are not shared with any third parties.
- The API is not intended for storing any personal data.
- The API is not intended for use by children under the age of 13.
- The API is not intended for use in any mission-critical applications.
- The API is provided as-is without any guarantees.
- By submitting ideas, user is responsible for the content they submit.
- The ideas submitted by the user will be considered public domain.
# <apiName> Privacy Policy
Last Updated: <lastUpdated>
## 1. Introduction
Welcome to <apiName>. This privacy policy outlines our practices regarding the collection, use, and sharing of information through <apiName>.
## 2. Data Collection and Use
<apiName> allows users to store, retrieve, list, and delete data. The data stored can be of any type as inputted by the user. We do not restrict or control the content of the data stored. <apiName> serves as a public database accessible to anyone with an API key.
## 3. User Restrictions
<apiName> does not impose age or user restrictions. However, users are advised to consider the sensitivity of the information they share.
## 4. Global Use
Our API is accessible globally. Users from all regions can store and access data on <apiName>.
## 5. Data Management
Given the nature of <apiName>, there are no user accounts or user identification measures. The API operates like a public database where data can be added, viewed, and deleted by any user. Users should be aware that any data they input can be accessed, modified, or deleted by other users.
## 6. Data Security
<apiName> is protected by an API key; beyond this, there is no specific data security measure in place. Users should not store sensitive, personal, or confidential information using <apiName>. We assume no responsibility for the security of the data stored.
## 7. Third-Party Involvement
The API code is run and data is stored by val.town. They act as a third-party service provider for <apiName>.
## 8. Changes to This Policy
We reserve the right to modify this privacy policy at any time. Any changes will be effective immediately upon posting on our website.
## 9. Contact Us
For any questions or concerns regarding this privacy policy, please contact us at <contactEmail>.
The ChatGPT prompt could look like this:
Please update the following privacy policy template with the information below:
- User's ideas are stored in a secure manner and are not shared with any third parties.- The API is not intended for storing any personal data.- The API is not intended for use by children under the age of 13.- The API is not intended for use in any mission-critical applications.- The API is provided as-is without any guarantees.- By submitting ideas user is responsible for the content they submit.- The ideas submitted by the user will be considered public domain.
Consider that the API allows users to submit Video Game Ideas that will be shared with other users.
Template:
```md...```
Make sure to replace the placeholders with the actual data:
<apiName>- the name of your API, for exampleVideo Game Idea API<lastUpdated>- the date when the privacy policy was last updated<contactEmail>- an email address that GPT users can contact you at
Once you have the privacy policy ready, you can store it in ValTown in a few ways:
- You can create a string variable in your API Val - simple, but makes the Val a bit messy
- You can create a separate Val with the privacy policy - this is a bit cleaner, but requires an additional Val
- You can use the
std/blobVal to store the privacy policy - clean but requires setting it up with a tool or separate val
We’re going use the first option here for the sake of simplicity and ease of copying the final solution. Add your policy at the bottom of the Val so it’s out of the way:
function getRandomElement<T>(array: T[]): T {  const randomIndex = Math.floor(Math.random() * array.length);  return array[randomIndex];}
const privacyPolicy = `# Video Game Idea API Privacy PolicyLast Updated: 2024-05-19
## 1. IntroductionWelcome to Video Game Idea API. This privacy policy outlines our practices regarding the collection, use, and sharing of information through Video Game Idea API.
## 2. Data Collection and Use...`;
To integrate it into our API, add a new property in our API configuration:
const api = new GptApi({ url: "https://xkonti-gameideaapi.web.val.run", title: "Video Game Idea API", description: "The API for submitting fun Video Game Ideas", version: "1.0.0", policyGetter: async () => { const { markdownToPrettyPage } = await import( "https://esm.town/v/xkonti/markdownToHtmlPage?v=5" ); return await markdownToPrettyPage(privacyPolicy); },});The policyGetter property accepts both async and non-async functions that return a string. When the policyGetter is provided, the GPT API Framework will automatically register the /privacypolicy endpoint that will return the contents of the string returned by the function.
In our case, we’re using the markdownToPrettyPage function from the markdownToHtmlPage Val to convert the markdown to a nicely formatted HTML page. This is not necessary, but it makes the policy look nicer.
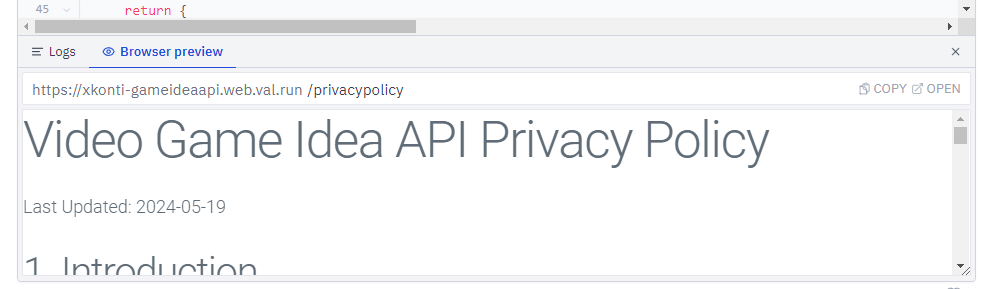
Save your val and head to the Browser preview. Add /privacypolicy to the URL and hit enter. You should see your privacy policy all properly rendered:
Copy the privacy policy URL and head to the GPT editor. Edit our existing action and on the bottom of the form you’ll see a field for the privacy policy URL.
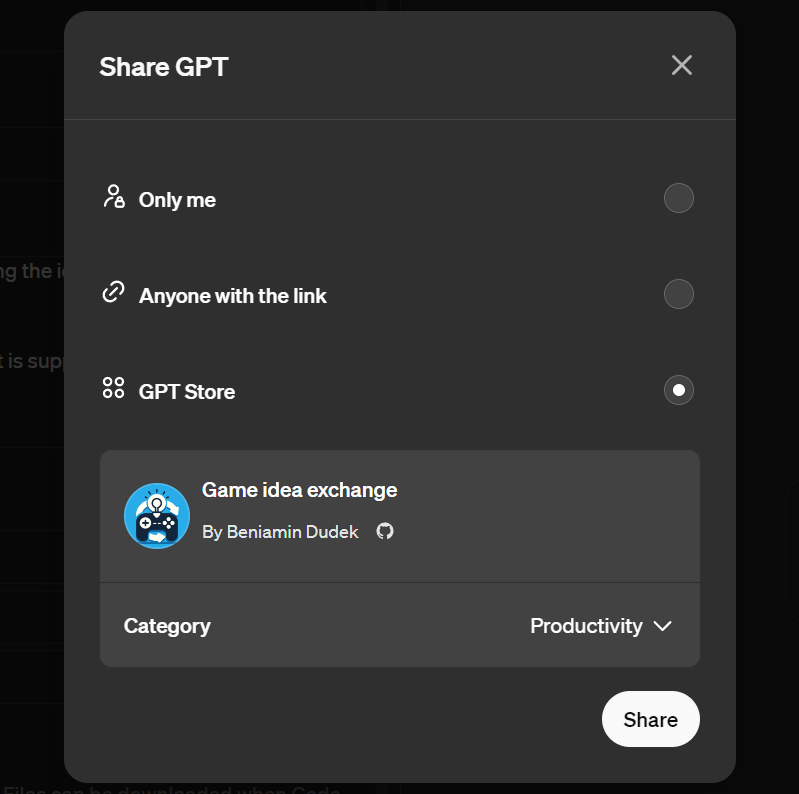
Now you should be able to share your GPT and publish it on the GPT store!
Conclusion
Feel free to play with the GPT we created: Video Game Idea GPT
I hope this guide was helpful and now you can build your own GPT with custom actions. The GPT API Framework makes it easy to create APIs that can be used by GPTs, and if you have some JavaScript/TypeScript skills, you can easily create your own solutions. You can view all the code we wrote on ValTown at the following links:
Not only can you view the code on ValTown, but you can also: - Fork the Vals to automatically create a copy in your account - Like Vals and leave comments
- Check for public Vals that use the
gptApiFrameworkVal - Submit PRs to Vals to suggest changes or improvements
If you have any questions or need help with your GPT, feel free to reach out to me on: